- Course Progress 92%
Chapter 12 – Simple, Powerful Social Proof By “Stacking Likes”
The Photo Album StackTM
You may have noticed that some photographs spread like wildfire, whereas others remain unnoticed or unshared. The only way we have to determine which photos will go the most viral is to test them. So you’ll find that when you post photos, some of them will go viral, but many of them won’t. We don’t re-post or re-share the ones that don’t go viral. It’s the re-posting of the photos that have tested to go viral that’s going to make your page grow completely virally. That’s the big secret.
When you find photos that get shared well on Facebook, you re-post them into an album on your Facebook page, and that’s what’s going to help your page grow. This technique is called the Photo Album Stack.
In the Photo Album Stack, you are “stacking” many photos into an album. When you post new photos into the album, over time your “stack” will accumulate many Likes, Comments, and Shares. If you recall, the more Likes you have, the more Likes you will get. The more you get, the higher your post moves up on Edgerank, the greater your reach, and the more people see your post.
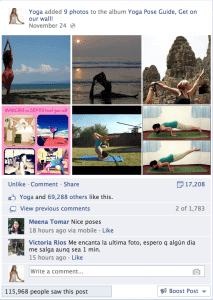
In this example, we posted nine photos into our album. Since we’ve been “stacking” photos into this album for months, the album has accumulated over 69,000 Likes, 17,000 Shares, and 1,700 Comments. The photos themselves all start with zero Likes, Comments, and Shares, but the album retains and accumulates new Likes, Comments, and Shares every time we post.
How to Create a Photo Album Stack
Step 1. On your Facebook page’s Wall, mouse over photo/video and click Create new album.
Do not click the Attach Photo/Video link, because if you do, you will only be posting photos on your Timeline and not in an album. When you upload photos into to the same album each time, the Likes will accumulate, and you will automatically gain massive social proof!
Step 2. Upload the photos to the new album. The first time you upload, give the album a title. Don’t worry about getting the title perfect; you can always change it.
I recommend posting at least nine photos each time. This makes an eye-catching 3x3 thumbnail picture.
Step 3. Check your Wall to make sure the photo album posted correctly to your page. You should also check your News Feed using your phone.
Remember, when we post these photos into the same photo album each time, we get the cumulative effect of all the Likes on the photos in the album. In this case, the numbers were 17,548 Likes, with 3,782 Shares and 393 Comments.
Every time we do a post like this, the Likes accumulate, which provides us with massive social proof. The result is that we get between 200 and 600 new fans every time we do it, for free!
Step 4. Advertise the post.
When you do any post, including the Photo Album Stack, you can advertise the post to your selected audience by turning the post into an ad. On albums, the Boost Post button is grayed out (i.e., inactive); however, never fear, advertising a Photo Album Stack is very simple and takes less than five minutes.
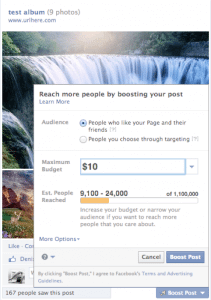
If you want to advertise your stack to supercharge the Likes, Comments, and Shares you get for your social proof, then simply go to your ads manager after creating your post. Select Advertise a Post, and find your Photo Album Stack in the post. Then, select your audience, targeting countries, interests, and budget. I’d recommend choosing a large audience to help you get inexpensive Likes and social proof. I like to start with a lifetime budget of $10 and advertise it for one day. A great way to really supercharge your stack is to create a $100 budget, and do 10 photo stacks on your page for 10 days in a row and spend $10 on ads per post.
One full day after you have posted your photos into your album and boosted the post, go through your nine photos to find the one that got the most Likes. This is the photo that your customers and fans liked the most. Therefore, this is the photo you should re-share on your Wall because it has the best chance of going viral.
Select the photo that has the most Likes and click the Share button. It’s best to write a description of the photos. Right underneath the photos, it says, “Say something about this photo…” and that’s where you write in the caption. Then, click the blue Post Photos button on the lower right to share it on your page’s Timeline.
This technique allows you to test all nine photos, and by re-sharing the one with the most Likes, you stand the best chance of posting content on your Wall that will get shared. With the Photo Album Stack, you can grow a page to as large as you possibly can virally.
Drive Targeted Traffic to Your Website with the Photo of the Day
Now that you’ve grown fans on your Facebook page using the Photo Album Stack, how do you get people off of your Facebook page and onto your website? Driving targeted traffic to your website is the most important thing you can do to drive sales, and that’s where we came up with the Photo of the Day technique (this lives on your website) and the Article Stack (this lives on your blog).
These techniques are how you find your fans who are qualified, prospective customers. Not only will they help you drive qualified buyers, but they will also help you build trust faster with your prospective customers.
The first step is to create a photo-of-the-day page on your website. You’re going to take the same photos that you use on your Photo Album Stack and put them on your website on a tab or a page called “Photo of the Day.”
Start by uploading at least 25 photos that got the most Likes while featured in your Photo Album Stack on Facebook. Put those on your website.
Now, the most critical thing here is to put only one Facebook Like button on your website. The biggest mistake that I see people make when they’re loading content onto their websites is that each post, whether it’s an article or a photo, has its own Like button. Well, when you do that, each Like button will start its count at zero.
You’ll be starting over every time.
So what I recommend instead is to put one Like button for the entire album, so every time you post a photo from the album or add new photos to the album, you can share the URL of that album on your Facebook Wall. Every time new people come to your website from Facebook and click the Like button, you will have the cumulative effect of all the past Likes. We currently have over 9,000 Likes on our Costa Rica Yoga photo-of-the-day stack.
Name Your Photo of the Day
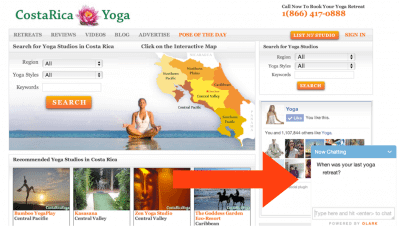
Because we have a yoga page, we call ours the pose of the day. You can get creative with this, but the important thing is, I would rather have one album “Liked” 9,000 times than have 9,000 photos, each Liked once. When somebody comes to our pose-of-the-day page, and they see an album that has 9,000 Likes, it means I have massive social proof. Then, this new visitor is far more likely to click the Like button themselves, which in turn shares the photo with their friends, which drives more targeted traffic to my website.
Using this process we were able to—for free—drive 15,000 fans a month from our Facebook page to our website, just with the photo-of-the-day stack.
See this in action here: www.costaricayoga.org/pose-of-the-day.
Question #1: Can I share other people’s photos?
Facebook is made to share photos. If you don’t want a photo shared on Facebook, then do not post it on Facebook. So the short answer here is yes, you can share other people’s photos through the Facebook Share button without anyone’s permission. The intention here, though, is to find photos that people want to share and find the best photos that are most likely to go viral, and then you’ll post those photos in your Photo Album Stack.
Question #2: Can I download someone else’s photo and upload to my photo stack?
If you are going to download someone else’s photo, this is something you need permission for. However, I find many times when ask, I’ve been given permission. The main reason is that people want their photos to be shared, and as long as you give them credit, they are usually very happy to have their photos shared all over Facebook.
Question: How do I give someone credit for their photo?
Use the Facebook Tag feature. When you post someone else’s photo, you simply type the @ symbol and then start typing the person’s name. Assuming you’re Facebook friends with this person, a drop-down list appears, and you will be able to select their name from that list. Facebook then applies their name as a “tag” to the photo.
You can do the same thing for a Facebook page that you want to tag, type the @ symbol and begin typing the name of the page. Select the correct page when it shows up in the drop-down menu. Alternatively, you can also give credit in the Comments on your post.
Drive traffic to your blog with the “Article StackTM”
What you want to do is create content that your customers want and need. When you can use that type of consumer education to market and sell your services, to help your customers solve their problems and see that you have solutions, that education is going to help you build credibility and trust, both of which are essential to getting fans to take action and become customers.
Content, providing valuable information, is now the new mainstream of marketing, and you want to create content that attracts prospective customers. Videos, papers, blogs, and tips are all different types of content that can attract customers.
Editorial marketing, infomercials, advertorials, and blogs are all different types of content marketing that can work. If you want people to go from Facebook to your website so you can request (for example) their e-mail addresses, your page and website need to be worth the time it takes for your prospective customers to fill out the form for your opt-in list. Remember, it’s a risk for your customers to give out their e-mail addresses. What is it that you’re going give them in return that’s worth it?
How are you going to capture their e-mail address? Well, one of the most powerful ways to do this is through the Article Stack, which lives on your blog. It turns your blog into massive social proof and establishes your authority in your marketplace.
When you create your blog content, first of all, make sure you’re creating content that meets your customers’ needs, solves their problems, and offers them real solutions. I’m assuming that you’re going to do that.
If you’re creating your blog, are you going to write the blog yourself, or are you going to have someone write the blog for you? If you’re going to write the content yourself, that’s fantastic.
However, if you feel like you don’t have the time to do it, there are lots of places to source articles from. There are free places, such as Articles Base, and there are paid places. My personal favorite is www.myarticlesexpress.com. So, if you want to have blogs written for you, you can hire someone to do that.
What you do on the article stack is, when you post articles on your blog, you want to put only one Like button at the top of your page. Again, the mistake that I see everybody make is, they put one Like button per post. Well, instead of doing that, put one Like button at the very top, above the individual blog content.
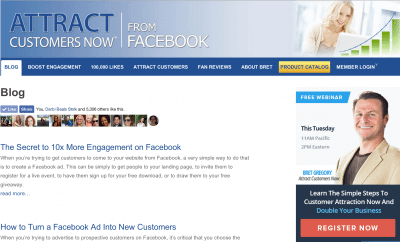
You can see how I do it if you go to www.AttractCustomersNow.com/blog. Look for the single Like button at the top of the page. Now, if you were to go to the front page of the Huffington Post or the New York Times and see their blog, their Like button counter might have 2,000 or 3,000 or 5,000 Likes at the top of a really good article. Mine has over 5,300 Likes, which really helps me be a recognized authority when it comes to my area of expertise, i.e., teaching marketing to entrepreneurs and coaches.
Now, I didn’t get all those Likes off of one article. I’ve been “Stacking” the Likes for months by using only one Like button counter code. So, every time I post a weekly blog, my Like button counter will grow a little bit more because I use the same code each time.
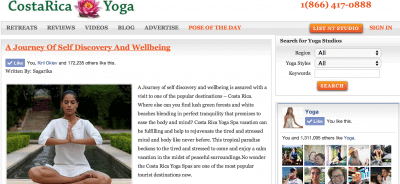
Here is another example on my other blog, www.costaricayoga.org/blog. The Article Stack establishes tremendous credibility and shows the value that we’ve been creating for our prospective customers. So whenever we post the link of our blog to our Facebook page, we get steady traffic coming back to our blog, and anybody who visits the blog sees instant social proof. You can see that 172,000 people have “Liked” our blog, which makes us the #1 authority in the world on Costa Rica Yoga topics.
How to Install the Article Stack on Your Blog
The great news here is you can easily create an Article Stack, too, and the best part is that it’s free!
So remember, in order to “stack” Likes on your blog, you’ll need to use only one Like button counter. The mistake that almost everyone makes is, their web developer will install a Like button counter “widget” that will automatically create a unique like button counter with each new blog. This works great if your blog gets over 300,000 visitors per month. However, if your blog gets less than that, your unique Like button counter will have very few, if any, Likes on each blog. This is social proof working against you.
Instead, try the Article Stack. You’ll need to get the code for one Like button counter by going here: https://developers.facebook.com/docs/plugins/like-button
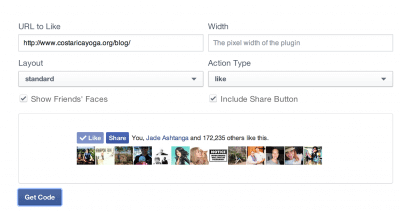
Put in the URL you want the visitors of your blog to “Like.” You can modify the layout, width, “Show Friends’ Faces,” and even “Include Share Button,” which I like to do. Then, click Get Code and have your developer install the same code on each new blog.
The key here is, it needs to be the same code on top of each blog post in order for you to be able to “stack” the Likes. Facebook keeps count of all of the people who have clicked the Like button, and you can install that same code on top of each new blog.
The Article Stack can very quickly make you the #1 authority in your category or niche. This can have a big impact on turning browsers into fans, and fans into customers. Once you have a few dozen Likes, or even a few hundred, on top of your blog, new browsers of your website will instantly recognize that you are a recognized expert in your field and may hire you to help them solve their problems.
New Chapter: Build Your List from Facebook, Newsletters Are Dead
Question: Can I use Facebook to get people to sign up for my newsletter?
This is something that we see a lot where people want to use Facebook to get people to sign up for their newsletter. They’ll have a Facebook page, they’ll drive traffic to their website, but nobody’s signing up for their newsletter.
Well, the first question I ask is: are you looking to sign up for more newsletters? If you’re like most people, your e-mail inbox is overwhelmed, and the last thing you want is another newsletter. Remember, it’s a risk for someone to give you their e-mail address because their e-mail is so clogged with junk mail already that they are very resistant to getting more. So the real question for you is, what value are your prospective customers going to get from your newsletter? The biggest mistake I see people making when they want to get people to sign up for their newsletter is, they say, “Sign up for my newsletter,” but they don’t tell the reader at all what value or what benefit they are going to get. What are you offering your prospective customers in exchange for their e-mail address?
So trash the traditional idea of trying to get your customers to sign up for your newsletter, and give your customers something they really value that is worth at least $100 in exchange for their e-mail address.
A better way to get people to give you their e-mail addresses is to ask your customers what their #1 problem is, and then, create a solution for them and give it to them for FREE, in addition to highly valuable content in your e-mails. I never say “newsletter;” instead, say highly valuable content.
Here is an alternative to a newsletter that we used to collect over 5,000 e-mail addresses in 30 days. These customers on our list receive our high-value content that goes out weekly.
First, we asked our customers what their #1 problem is, and we kept hearing that most posts they put on their Facebook page would get few, if any, Likes, Comments, and Shares. They had a hard time finding amazing viral photos that they could use on their Facebook page. So I made a fully editable template of my top 15 all-time most viral posts that anyone could download, and I gave it away for free in exchange for joining my e-mail list.

To build my e-mail list, I also use lead pages, which you can get by going to http://bit.ly/MyLeadPages. There, I can quickly create awesome landing pages that collect tons of e-mails.
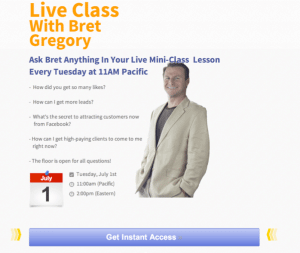
Here is my most successful e-mail “lead magnet” from my free weekly Attract Customers Now from Facebook Live Class. I convert more customers with these free weekly webinars than anything else I do, and this one free giveaway is directly responsible for at least $30,000 per month in new coaching clients and online product sales.
Exercise: Write down five things (other than a newsletter or blog) that you can offer your customers in exchange for their e-mail address. Be sure it’s worth at least $100 in value to your customer.
Examples: free template downloads, white papers, e-books, weekly live class membership, or 30-minute one-on-one consultations.
1) __________________________________________
2) __________________________________________
3) __________________________________________
4) __________________________________________
5) __________________________________________
New Chapter Converting Browsers into Customers
Imagine for a moment that you walked into an Apple store, but there were no humans working there. The only thing that you could do would be to look at the products, which might be kind of neat, but you couldn’t ask any questions of anybody. Or if you were to ask a question, you had to call on your phone, or you had to tap on a screen somewhere, but you couldn’t actually talk to a human. Doesn’t that scenario seem strange to you?
Well, that’s exactly what people are trying to do when they create automated websites and attempt to get people to buy their products and services without ever talking to them, or without letting them engage with a live human being. And by doing things this way, they’re going about sales the wrong way. People love talking to other people, getting their questions answered, and getting their needs met. So the answer is simple—provide the experience your customers want.
The most effective way in which I’ve done this is to engage customers at the point-of-sale with online chat. When we were able to engage prospective customers at point-of-sale via our online chat, I was able to answer every single question they had, and do it to their satisfaction. I was also able to increase our e-mail capture rate massively. We quadrupled our e-mail capture rate, and this, plus our ability to engage people at point-of-sale, ultimately enabled us to generate $1.5 million in sales—just with this one little change.
It’s all because we brought the human element to our website. It was no longer a faceless page. Our prospects—our customers—were dealing with a real human that they could add as a friend on Facebook, and that is what got us to the finish line in sales.
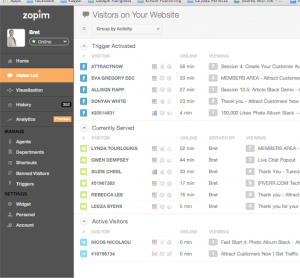
We use free software called Zopim (www.zopim.com) for our online chat, but there are lots of similar options out there that you can use.
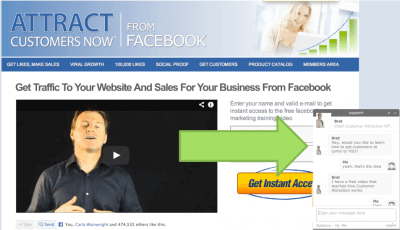
The interesting thing about online chat is you may see lots of websites out there, even large websites, using it. If you go to AT&T, for example, you might see an example of this. But the biggest mistake that some of those companies are making is that you’re not chatting with someone who seems like a real human, you’re chatting with a faceless customer service representative.
Let me share the thing that actually got us $1.5 million in sales: when people came to our website, they got to interact with a real human. The human happened to be me. I was able to chat with people proactively, and they weren’t chatting with www.costaricayoga.org, they were chatting with me, Bret, personally. I was able to answer their questions and give them what they needed.
Online chat is a great way to get qualified prospects to book a free consultation with you, which is the best way that I know to consistently convert high-paying coaching clients, or high-ticket customers.
On the lower right hand corner of my website you’ll see the following tab:

Help customers purchase by putting your chat feature right next to your product or buy button, and ask specific questions that can help them buy. For instance, on my product page, I might ask someone, “Are you an enlightened entrepreneur looking to attract conscious customers now?” If they reply yes, then there is a very good chance I will be able to help them purchase one of my products by chatting with them and being helpful.
If they are not ready to purchase anything, I can chat with them and provide a link to my free downloads or weekly class. Many times, people just aren’t ready to buy right away; however, after they see how high-quality my free content is, they ultimately purchase a product or sign up for a course.
In a recent webinar, we had 70 attendees. This led to 12 people perusing my site after the webinar, and I chatted with them live using Zopim. This converted into nine sales for $9,000 within 90 minutes. I know that using the online chat generated these sales because while I was chatting with people, I could ask them post-purchase whether they would have made the purchase without being able to interact with me directly and ask questions. Most of them said no.